


Some web applications must protect their authentication tokens or session IDs from cross-site scripting (XSS). It is an Open Web Application Security Project (OWASP) best practice for session management to store secret information in the cookie store of browsers with the HttpOnly attribute enabled. When cookies have the HttpOnly attribute set, the browser will prevent client-side JavaScript code from accessing this value, reducing the risk of revealing secret data.
With the following article, you will get a dose of knowledge on how to store access tokens and authenticate with HttpOnly cookies in your workloads when using the Amazon API Gateway as a client-directed endpoint. The tutorial in this article will present a solution for storing OAuth2 access tokens in a browser cookie shop and verifying user authentication through the Amazon API Gateway. This text describes how to use Amazon Cognito to issue OAuth2 access tokens, but the solution is not limited to OAuth2. You can use other types of tokens or session IDs.
The solution consists of two independent parts:
- OAuth2 flow
- Authentication check
Note: The tutorial below provides detailed step-by-step instructions for implementing the sample solution. If you prefer to implement the solution using a script, see api-gw-http-only-cookie-auth in the GitHub repository.
Prerequisites
- You should have an AWS account.
- You should have a 200-300 level knowledge of the OAuth2 protocol.
- You should have the AWS command line interface (AWS CLI) installed.
- You should have the AWS Toolkit for Visual Studio Code installed so you can easily upload your code.
- It would be best if you hadNode.js installed on your local machine.
- This solution uses the following services:
- Amazon Cognito
- Amazon API Gateway
- AWS Lambda
There should be no cost to deploy the application from this tutorial, as the services you intend to use are included in the free AWS tier. However, please note that small charges may apply if you have other workloads running on your AWS account that exceed the free tier. Remember to remove resources from this tutorial after deployment.
Solution architecture
This solution uses Amazon Cognito, Amazon API Gateway, and AWS Lambda to build a response that maintains OAuth2 access tokens in a browser cookie store. Figure 1 illustrates the solution architecture for an OAuth2 flow.

- A user authenticates using Amazon Cognito.
- Amazon Cognito has an OAuth2 redirect URI pointing to the API gateway endpoint and calls the integrated Lambda function oAuth2Callback.
- The oAuth2Callback Lambda function sends a request to the Amazon Cognito token endpoint with the OAuth2 authorisation code to obtain the access token.
- The Lambda function returns a response with a Set-Cookie header, instructing the web browser to persist the access token as an HttpOnly cookie. The browser will automatically interpret the Set-Cookie header as this is a web standard. HttpOnly cookies cannot be accessed via JavaScript - they can only be set via the Set-Cookie header.
After the OAuth2 flow, you are configured to issue and store access tokens. It would be best to verify that users are authenticated before they can access the protected backend. Figure 2 illustrates how authentication checking is handled.

- When a user requests a protected backend resource, the browser automatically appends HttpOnly cookies to each request, as defined in the web standard.
- The Lambda function oAuth2Authorizer acts as a Lambda authenticator for the HTTP API.It checks whether the requests are authenticated. If the requests contain the appropriate access token in the request cookie header, the request is allowed.
- API Gateway only passes authenticated requests.
Amazon Cognito is not involved in authentication checking, as the Lambda function can verify OAuth2 access tokens using JSON web token (JWT) validation.
1 Implementing the OAuth2 flow
In this section, you will implement the first part of the solution, the OAuth2 flow. The OAuth2 flow is responsible for issuing and maintaining OAuth2 access tokens in the browser's cookie store.
1.1 Create an artificially protected backend
As shown in Figure 2, you need to protect the backend. For this text, you create a sample backend by creating a simple Lambda function with a default response.
To create a Lambda function
- In the Lambda console, select: Create function
Note: make sure you have selected your AWS Region
- Select Author from scratch as the option to create a feature.
- In the Basic Information section, as shown, enter or select the following values:
- In the Function Name field, enter getProtectedResource.
- For the execution environment, select Node.js 16.x.
- For the architecture, select arm64 because arm64 was designed to be faster and cheaper.
- Select Create Function.

The default Lambda function code returns a simple Hello from Lambda message, which is sufficient to demonstrate the concept of this solution.
- Create an HTTP API in the Amazon API Gateway
Next, create an HTTP protocol API using the API gateway. Either an HTTP API or a REST API will work. In this example, choose the HTTP API because it is offered at a lower price (remember, in this tutorial, you remain in the free tier).
To create the Gateway API
- In the Gateway API console, under HTTP API, select Build.
- On the Create and Configure Integrations page, as shown in Figure 4, select Add Integration and then enter or select the following values:
- Select Lambda.
- For Lambda, select the getProtectedResource Lambda function created in the previous section.
- In the API Name field, enter a name. In this example, MyApp is used.
- Select Next.

- On the Configure Routes page, as shown in Figure 5, enter or select the following values:
- Select GET as the Method.
- In the Resource Path field, enter / (single slash).
- As the Integration Target, select the getProtectedResource function.
- Select Next.

- On the Configure stages page, keep all the default options and select Next.
- On the Review and Create page, select Create.
- Make a note of the Invoke URL value, as shown in Figure 6.

Now it's time to test the Gateway API. Paste the Invoke URL value into your browser. You will see the following message from your Lambda function: Hello from Lambda.
Use Amazon Cognito
You will use Amazon Cognito user pools to create and maintain a user directory and add registrations and logins to your web application.
To create an Amazon Cognito user pool
- In the Amazon Cognito console, select Create user pool.
- On the Authentication Provider page, as shown in Figure 7, for the Cognito user pool login option, select Email and then select Next.

- In the Multi-Factor Authentication pane on the Configure Security Requirements page, as shown in Figure No. 8, select MFA. In this example, select No MFA service to facilitate testing of the solution. However, in a production environment for data-sensitive workloads, select Require MFA service - recommended. Select Next.

- Keep all the default options on the Configure Registration page and select Next.
- On the Configure Message Delivery page, as shown in Figure 9, select an email provider. In this example, select Send email using Cognito to facilitate testing of the solution. For production workloads, select Send email using Amazon SES - recommended. Select Next.

- In the User Pool Name section of the Integrate Your Application page, as shown in Figure 10, enter or select the following values:
- Enter a name in the User Pool Name field. In this example, I have used MyUserPool.

- In the Hosted Authentication Pages section, as shown in Figure No. 11, select Use Cognito Hosted User Interface.

- In the Domain section, as shown in Figure No. 12, for the Domain Type option, select Use Cognito Domain. In the Cognito Dom ain field, enter a domain name. Remember that domains in Cognito must be unique. Also be aware to enter a unique name, for example by adding random numbers to the end of the domain name. In this example I have used https://http-only-cookie-secured-app.

In the Initial Application Client section, as shown in Figure 13, enter or select the following values:
- For Application Type, keep the default setting Public Client.
- In the Application Client Name field, enter a friendly name. In this example, MyAppClient is used.
- For the client secret key, keep the default setting Do not generate client secret key.
- In the Allowed callback URLs field, enter /oauth2/callback, replacing the callback URL you noted in the API Gateway in the previous section.

- Select Next
- Select Create user pool
Next, you need to download some Amazon Cognito information for later use.
To save Amazon Cognito information
- In the Amazon Cognito console, select the user pool you created in the previous steps.
- In the User Pool Overview area, note the value of the user pool ID.
- On the Application Integration tab, in the Cognito Dom ain area, note the Domain value.
- In the Application Client List area, note the value of the client ID.
- In the Application Client List area, select the application client name created in the previous steps.
- In the Hosted User Interface area, note the value of Allowed callback URLs.
Next, create the user you will use later in this blog post to run the test.
To create a user
- In the Amazon Cognito console, select the user pool created in the previous steps.
- In the Users section, select Create User.
- In the Email address field, enter [email protected]. In this tutorial, you don't need to send actual emails, so the email address doesn't need to exist.
- Select Mark's email address as verified.
- For Password, enter a password that you can remember (or better yet: use a password generator).
- Remember the e-mail address and password for later use.
- Select Create user.
1.4 Create the Lambda function oAuth2Callback
Next, you create the Lambda function oAuth2Callback, which is responsible for issuing and fixing OAuth2 access tokens.
To create the Lambda function oAuth2Callback
- In the Lambda console, select Create function.
Note: Make sure you select the desired Region.
- In the Function name field, type oAuth2Callback.
- As the execution environment, select Node.js 16.x.
- Under Architecture, select arm64.
- Select Create function.
After creating the Lambda function, you need to add the code. Create a new folder on your local computer and open it in your preferred integrated development environment (IDE). Add the package.json and index.js files, as shown in the examples below.
package.json
{
  "name": "oAuth2Callback",
  "version": "0.0.1",
  "dependencies": {
    "axios": "^0.27.2",
    "qs": "^6.11.0"
  }
}
In a terminal in the root directory of the created folder, run the following command.
$ npm install
In the following example index.js code, remember to replace the replacement symbols with your own values.
index.js
const qs = require("qs");
const axios = require("axios").default;
exports.handler = async function (event) {
  const code = event.queryStringParameters?.code;
  if (code == null) {
    return {
      statusCode: 400,
      body: "code query param required",
    };
  }
  const data = {
    grant_type: "authorization_code",
    client_id: "",
    // The redirect has already happened, but you still need to pass the URI for validation, so a valid oAuth2 access token can be generated
    redirect_uri: encodeURI(""),
    code: code,
  };
  // Every Cognito instance has its own token endpoints. For more information check the documentation: https://docs.aws.amazon.com/cognito/latest/developerguide/token-endpoint.html
  const res = await axios.post(
    "/oauth2/token",
    qs.stringify(data),
    {
      headers: {
        "Content-Type": "application/x-www-form-urlencoded",
      },
    }
  );
  return {
    statusCode: 302,
    // These headers are returned as part of the response to the browser.
    headers: {
      // The Location header tells the browser it should redirect to the root of the URL
      Location: "/",
      // The Set-Cookie header tells the browser to persist the access token in the cookie store
      "Set-Cookie": `accessToken=${res.data.access_token}; Secure; HttpOnly; SameSite=Lax; Path=/`,
    },
  };
};
Along with the HttpOnly attribute, you pass two additional cookie attributes:
- Secure - Indicates that cookies are only sent by the browser to the server when a request is sent using the https: scheme.
- SameSite - Controls whether a cookie is sent with requests between sites, providing protection against attacks involving falsification of requests between sites. You set the value to Lax because you want the cookie to be set when a user is passed from Amazon Cognito to your web application (which runs at a different URL).
For more information, see Using HTTP cookies on the MDN Web Docs site.
Then, the code is passed to the oAuth2Callback Lambda function as described in Passing Lambda Functions in the AWS Toolkit for VS Code User Guide.
1.5 Configure the OAuth2 callback route in the API Gateway
You will now configure the API Gateway to use the new Lambda function by integrating with the Lambda proxy
To configure the API Gateway to use the Lambda function
- In the API Gateway console, in the API area, select your API name. In the example, the name is MyApp.
- In the Develop section, select Routes.
- Select Create.
- Enter or select the following values:
- Select GET as the method.
- Enter /oauth2/callback as the path.
- Select Create.
- Select GET in /oauth2/callback, then select Include integration.
- Select Create and attach the integration.
- Select Lambda function as the Integration Type.
- For the Lambda function, select oAuth2Callback from the last step.
- Select Create.
Your route configuration in API Gateway should now look like Figure 14.

2 Implementing the OAuth2 flow
Now that the components are in place, you can test the OAuth2 flow by running the login in your browser.
To test an OAuth2 flow
- In the Amazon Cognito console, select the name of your user pool. In the example, the name is MyUserPool.
- In the navigation tabs, select Application Integration.
- In the Application Client List area, select the name of your application client. In the article, the name is MyAppClient.
- Select View hosted user interface.
- In the newly opened browser tab, open Developer Tools to check the network requests.
- Log in with the email address and password you set in the previous section. Change the password if you are prompted to do so. You can also choose the same password you set in the last section.
- You should see a Hello from Lambda message.
To check that the cookie has been placed correctly
- Check your browser's network tab in your developer browser settings. You will see the /oauth2/callback request, as shown in Figure 15.

- The response headers should contain the set-cookie header, as specified in the Lambda function. With the set-cookie header, the OAuth2 access token is set as an HTTPOnly cookie in the browser, and access is denied from any client-side code.
- Alternatively, you can check the cookie in the browser's cookie store, as shown in Figure 16.
- If you want to retry authentication, navigate to the Amazon Cognito domain you selected in the previous section in the browser and clear all site data in the browser's developer tools. Do the same with the API gateway call URL. You can now run the test again from a clean state.
3 Implementing authentication verification
In this section, you will implement the second part of your application: authentication verification. The authentication check ensures that only verified users can access the protected backend. The authentication check works with the HttpOnly cookie, which is stored in the user's cookie store.
3.1 Create the Lambda function oAuth2Authorizer
This Lambda function checks whether requests are authenticated.
To create a Lambda function
- In the Lambda console, select the Create function.
Note: Make sure you select the desired Region.
- In the Function name field, type oAuth2Authorizer.
- As the execution environment, select Node.js 16.x.
- Under Architecture, select arm64.
- Select the Create function.
After creating the Lambda function, you need to add the code. Please create a new folder on your local computer and open it with your preferred IDE. Add the package.json and index.js files as shown in the examples below.
package.json
{
  "name": "oAuth2Authorizer",
  "version": "0.0.1",
  "dependencies": {
    "aws-jwt-verify": "^3.1.0"
  }
}
In a terminal in the root directory of the created folder, run the following command.
$ npm install
Remember to replace the placeholders with your values in the index.js example code.
index.js
const { CognitoJwtVerifier } = require("aws-jwt-verify");
function getAccessTokenFromCookies(cookiesArray) {
  // cookieStr contains the full cookie definition string: "accessToken=abc"
  for (const cookieStr of cookiesArray) {
    const cookieArr = cookieStr.split("accessToken=");
    // After splitting you should get an array with 2 entries: ["", "abc"] - Or only 1 entry in case it was a different cookie string: ["test=test"]
    if (cookieArr[1] != null) {
      return cookieArr[1]; // Returning only the value of the access token without cookie name
    }
  }
  return null;
}
// Create the verifier outside the Lambda handler (= during cold start),
// so the cache can be reused for subsequent invocations. Then, only during the
// first invocation, will the verifier actually need to fetch the JWKS.
const verifier = CognitoJwtVerifier.create({
  userPoolId: "",
  tokenUse: "access",
  clientId: "",
});
exports.handler = async (event) => {
  if (event.cookies == null) {
    console.log("No cookies found");
    return {
      isAuthorized: false,
    };
  }
  // Cookies array looks something like this: ["accessToken=abc", "otherCookie=Random Value"]
  const accessToken = getAccessTokenFromCookies(event.cookies);
  if (accessToken == null) {
    console.log("Access token not found in cookies");
    return {
      isAuthorized: false,
    };
  }
  try {
    await verifier.verify(accessToken);
    return {
      isAuthorized: true,
    };
  } catch (e) {
    console.error(e);
    return {
      isAuthorized: false,
    };
  }
};
J
After adding the package.json and index.js files, pass the code to the Lambda function oAuth2Authorizer as described in the Upload a Lambda Function topic in the AWS Toolkit for VS Code User Guide.
3.2 Configure the Lambda Authorizer in the API Gateway
Next, configure the Lambda authorizer function to protect the backend. In this way, you control access to your HTTP API.
To configure the Lambda function authorizer
- In the API Gateway console, in the API area, select your API name. In the tutorial, the name is MyApp.
- In the Develop section, select Routes.
- In the / (single slash) GET area, select Attach Authorisation.
- Select Create and attach authorization.
- Select Lambda.
- Enter or select the following values:
- In the Name field, enter oAuth2Authorizer.
- For the Lambda function, choose oAuth2Authorizer.
- Clear the authorization cache. In this tutorial, you will disable authorization caching to simplify testing. See Bonus: Enabling authorization caching for more information on enabling caching to improve performance.
- Under Identity sources, select Delete.
Note: Identity sources are ignored for Lambda authentication. They are only used for caching.
- Select Create and Attach.
- In the Develop section, select Routes to check all routes.
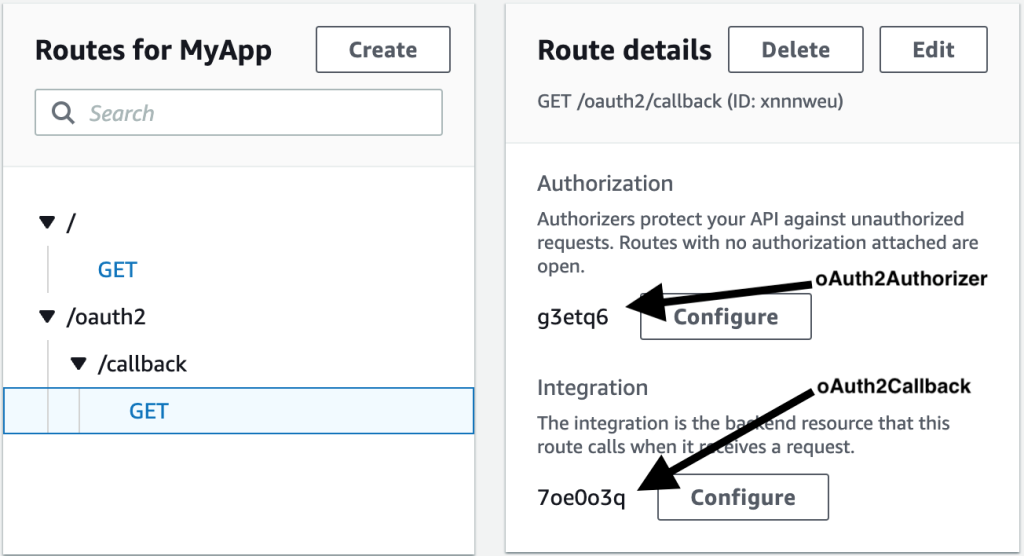
Now, your Gateway /oauth2/callback API route should be configured as shown in Figure 17.
 { if (event.cookies == null) { console.log("No cookies found"); return { isAuthorized: false, }; } // Cookies array looks something like this: ["accessToken=abc", "otherCookie=Random Value"] const accessToken = getAccessTokenFromCookies(event.cookies); if (accessToken == null) { console.log("Access token not found in cookies"); return { isAuthorized: false, }; } try { await verifier.verify(accessToken); return { isAuthorized: true, }; } catch (e) { console.error(e); return { isAuthorized: false, }; } };" title="const { CognitoJwtVerifier } = require("aws-jwt-verify"); function getAccessTokenFromCookies(cookiesArray) { // cookieStr contains the full cookie definition string: "accessToken=abc" for (const cookieStr of cookiesArray) { const cookieArr = cookieStr.split("accessToken="); // After splitting you should get an array with 2 entries: ["", "abc"] - Or only 1 entry in case it was a different cookie string: ["test=test"] if (cookieArr[1] != null) { return cookieArr[1]; // Returning only the value of the access token without cookie name } } return null; } // Create the verifier outside the Lambda handler (= during cold start), // so the cache can be reused for subsequent invocations. Then, only during the // first invocation, will the verifier actually need to fetch the JWKS. const verifier = CognitoJwtVerifier.create({ userPoolId: "", tokenUse: "access", clientId: "", }); exports.handler = async (event) => { if (event.cookies == null) { console.log("No cookies found"); return { isAuthorized: false, }; } // Cookies array looks something like this: ["accessToken=abc", "otherCookie=Random Value"] const accessToken = getAccessTokenFromCookies(event.cookies); if (accessToken == null) { console.log("Access token not found in cookies"); return { isAuthorized: false, }; } try { await verifier.verify(accessToken); return { isAuthorized: true, }; } catch (e) { console.error(e); return { isAuthorized: false, }; } };" />
Testing the OAuth2 authorizer
You have succeeded! Since the last test, you should still be authenticated. So, if you open the Gateway Invoke API URL in your browser, you will be greeted by the protected backend.
If you are no longer authenticated, you will need to follow the steps in the Testing OAuth2 flow section again to authenticate.
When you check the HTTP request sent by the browser in the developer tools, as shown in Figure 18, you will see that authentication is working because the HttpOnly cookie is automatically appended to each request.

Paste the Invoke URL you noted earlier in the incognito window to check that the Lambda authorizer function is working correctly. The incognito windows do not share a cookie store with the browser session, so an error message {‘message’: ‘Forbidden’} is displayed with the HTTP response code 403 - Forbidden.
Clean up
Remove all unwanted resources to avoid incurring costs.
To remove the Amazon Cognito domain and user pool
- In the Amazon Cognito console, select the name of your user pool. In the tutorial, the name is MyUserPool.
- In the navigation tabs, select Application Integration.
- Under Domain, select Actions and then Delete Cognito domain.
- Confirm by entering a custom Amazon Cognito domain and selecting Delete.
- Select Delete user pool.
- Confirm by entering the name of your user pool (in my case, MyUserPool) and then selecting Delete.
To delete an API Gateway resource
- In the API Gateway console, select your API name. In the example, the name is MyApp.
- In the Actions area, select Delete and confirm the deletion.
To delete AWS Lambda functions
- In the Lambda console, select all three Lambda functions you created.
- In the Actions area, select Delete and confirm the deletion.
Bonus: Enable authentication caching
As mentioned earlier, you can enable authorisation caching to improve performance. When caching is enabled for authorisations, API Gateway uses the authorisation identity sources as a cache key. If the client specifies the same parameters in the identity sources within the configured time-to-live (TTL), the API Gateway will use the authorisation result from the cache instead of calling the Lambda function.
To enable caching, the authenticator must have at least one identity source. To cache by cookie request header, specify $request.header.cookie as the identity source. Note that this will affect caching if you pass additional HttpOnly cookies in addition to the access token.
For more information, see Working with AWS Lambda authorisers for HTTP APIs in the Amazon API Gateway Developer Guide.
Conclusions
With the help of this article, you have learned how to implement authentication using HttpOnly cookies. You have used Amazon API Gateway and AWS Lambda to fix and validate HttpOnly cookies, and Amazon Cognito to issue OAuth2 access tokens. If you would like to try an automated scripted implementation of this solution, see the GitHub repository api-gw-http-only-cookie-auth.
The use of this solution to protect your secrets from potential cross-site scripting (XSS) attacks is not limited to OAuth2. You can protect other types of tokens, sessions or tracking identifiers with HttpOnly cookies.
In this solution you have used NodeJS for your Lambda functions to implement authentication. But HttpOnly cookies are widely supported by many development platforms. More implementation options can be found on the OWASP Secure Cookie Attribute page.
While the article provides a tutorial on implementing HttpOnly cookie authentication in the API Gateway service, it may not meet all security and functionality requirements. Remember to check your business requirements and talk to your stakeholders before applying the techniques discussed in this article.
In addition, it is a good idea to continually test your web application so that cookies are only placed with approved security attributes. You can find more information on the OWASP Testing for Cookies Attributes page .
